My son's girlfriend has made a healthy keto blog with treats, snacks, meals, and desserts! Loaded with tasty recipes and amazing low carb food photos! She even makes keto birthday cakes! Please visit her for Delicious Keto & Low Carb Recipes!
Showing posts with label Daring bakers. Show all posts

Nanaimo Bars

>> Tuesday, January 26, 2010


My favorite part of joining The Daring Bakers is the excitement every month that comes from exploring new recipes.
This month our chalange was from our neighbors to the north and the host of the 2010 winter Olympic games, Canada.

The opportunity to create the Canadian chocolate bars, Nanaimo Bars was a refreshing change from my usual baking.
I kept the original recipe in order to create the most authentic foreign delight.
My family and I thank Lauren for exposing us to this yummy bars.


The January 2010 Daring Bakers’ challenge was hosted by Lauren of Celiac Teen.

Lauren chose Gluten-Free Graham Wafers and Nanaimo Bars as the challenge for the month.
The sources she based her recipe on are 101 Cookbooks and www.nanaimo.ca. , and gave us the option to use a regular flour as well, so I choose the Graham wafers recipes from the Smitten Kitchen

Graham Wafers - Smitten Kitchen

Makes 10 4 x 4.5-inch graham crackers or 48 2-inch squares

2 1/2 cups plus 2 tablespoons (375 grams) unbleached all-purpose flour
1 cup (176 grams) dark brown sugar, lightly packed
1 teaspoon (6 grams) baking soda
3/4 teaspoon kosher or coarse sea salt (4 grams)
7 tablespoons (3 1/2 ounces or 100 grams) unsalted butter, cut into 1-inch cubes and frozen
1/3 cup (114 grams) mild-flavored honey, such as clover
5 tablespoons (77 grams) milk, full-fat is best
2 tablespoons (27 grams) pure vanilla extract

Make the dough:

Combine the flour, brown sugar, baking soda, and salt in the bowl of a food processor fitted with the steel blade or in the bowl of an electric mixer fitted with the paddle attachment.
Pulse or mix on low to incorporate.
Add the butter and pulse on and off on and off, or mix on low, until the mixture is the consistency of a coarse meal.

In a small bowl, whisk together the honey, milk, and vanilla extract.
Add to the flour mixture and pulse on and off a few times or mix on low until the dough barely comes together.
It will be very soft and sticky.
Lay out a large piece of plastic wrap and dust it lightly with flour, then turn the dough out onto it and pat it into a rectangle about 1-inch thick.
Wrap it, then chill it until firm, about 2 hours or overnight.

Roll out the crackers:
Divide the dough in half and return one half to the refrigerator.
Sift an even layer of flour onto the work surface and roll the dough into a long rectangle about 1/8 inch thick. The dough will be sticky, so flour as necessary. Trim the edges of the rectangle to 4 inches wide.
Working with the shorter side of the rectangle parallel to the work surface, cut the strip every 4 1/2 inches to make 4 crackers.
Place the crackers on one or two parchment-lined baking sheets and sprinkle with the topping. Chill until firm, about 30 to 45 minutes in the fridge or 15 to 20 minutes in the freezer.
Repeat with the second batch of dough.
Finally, gather any scraps together into a ball, chill until firm, and re-roll.

Adjust the oven rack to the upper and lower positions and preheat the oven to 350°F.

Bake for 15 to 25 minutes, until browned and slightly firm to the touch, rotating the sheets halfway through to ensure even baking.


For Nanaimo Bars — Middle Layer
1/2 cup (115 g) (4 ounces) Unsalted Butter
2 tablespoons and 2 teaspoons (40 mL) Heavy Cream
2 tablespoons (30 mL) Vanilla Custard Powder (Such as Bird’s. Vanilla pudding mix may be substituted.)
2 cups (254 g) (8.9 ounces) Icing Sugar

For Nanaimo Bars — Top Layer
4 ounces (115 g) Semi-sweet chocolate
2 tablespoons (28 g) (1 ounce) Unsalted Butter

Directions:
For bottom Layer:
Melt unsalted butter, sugar and cocoa in top of a double boiler.
Add egg and stir to cook and thicken.
Remove from heat.
Stir in crumbs, nuts and coconut. Press firmly into an ungreased 8 by 8 inch pan.

For Middle Layer:
Cream butter, cream, custard powder, and icing sugar together well.
Beat until light in color.
Spread over bottom layer.
For Top Layer:
Melt chocolate and unsalted butter over low heat.
Cool. Once cool, pour over middle layer and chill.

Additional Information:

These bars freeze very well, so don’t be afraid to pop some into the freezer.

The graham wafers may be kept in an airtight container for up to 2 weeks.


Read more...

Gingerbread House - Daring Bakers

>> Friday, December 25, 2009


The December 2009 Daring Bakers’ challenge was brought to you by Anna of Very Small Anna and Y of Lemonpi. They chose to challenge Daring Bakers’ everywhere to bake and assemble a gingerbread house from scratch. They chose recipes from Good Housekeeping and from The Great Scandinavian Baking Book as the challenge recipes.
Thank you Anna & Y.


December challenge was an excitement and unique experience for me.
I never thought I would build something amazing and adventurous like the Gingerbread house.
It allowed me to express my creativity through a fun activity.
The family and I all gathered together and decided to house a once homeless Gingerbread man.

My husband helped assembled the pieces together
My little son jumped to color the Gingerbread man
and all the other family members helped decorate the cute house.


I choose Y recipes - Scandinavian Gingerbread (Pepparkakstuga)
(from The Great Scandinavian Baking Book by Beatrice Ojakangas)

1 cup butter, room temperature [226g]
1 cup brown sugar, well packed [220g]
2 tablespoons cinnamon
4 teaspoons ground ginger
3 teaspoons ground cloves
2 teaspoons baking soda
½ cup boiling water
5 cups all-purpose flour [875g]

1. In a large bowl, cream the butter and sugar until blended. Add the cinnamon, ginger and cloves. Mix the baking soda with the boiling water and add to the dough along with the flour. Mix to make a stiff dough. If necessary add more water, a tablespoon at a time. Chill 2 hours or overnight.

2. Cut patterns for the house out of cardboard.

3. Roll the dough out on a large, ungreased baking sheet and place the patterns on the dough. Mark off the various pieces with a knife, but leave the pieces in place.

4. [Y rolled out the dough on a floured bench, roughly 1/8 inch thick (which allows for fact that the dough puffs a little when baked), cut required shapes and transferred them to the baking sheet. Any scraps were saved and rerolled at the end.]

5. Preheat the oven to 375'F (190'C). Bake for 12 to 15 minutes until the cookie dough feels firm. After baking, again place the pattern on top of the gingerbread and trim the shapes, cutting the edges with a straight-edged knife. Leave to cool on the baking sheet.

Royal Icing:

1 large egg white
3 cups (330g) powdered sugar
1 teaspoon white vinegar
1 teaspoon almond extract

Beat all ingredients until smooth, adding the powdered sugar gradually to get the desired consistency. Pipe on pieces and allow to dry before assembling. If you aren't using it all at once you can keep it in a small bowl, loosely covered with a damp towel for a few hours until ready to use. You may have to beat it slightly to get it an even consistency if the top sets up a bit. Piped on the house, this will set up hard over time.


Read more...

Cannoli

>> Friday, November 27, 2009


The November 2009 Daring Bakers Challenge was chosen and hosted by Lisa Michele of Parsley, Sage, Desserts and Line Drives.
She chose the Italian Pastry, Cannolo (Cannoli is plural), using the cookbooks Lidia’s Italian-American Kitchen by Lidia Matticchio Bastianich and The Sopranos Family Cookbook by Allen Rucker; recipes by Michelle Scicolone, as ingredient/direction guides. She added her own modifications/changes, so the recipe is not 100% verbatim from either book
.


Equipment:
Cannoli forms/tubes - optional, but recommended if making traditional shaped cannoli.

Dried cannelloni pasta tubes work just as well!
Deep, heavy saucepan, enough to hold at least 2-3-inches of oil or deep fryer
Deep fat frying thermometer. although the bread cube or bit of dough test will work fine.
Metal tongs
Brass or wire skimmer OR large slotted spoon
Pastry bag with large star or plain tip, but a snipped ziplock bag, butter knife or teaspoon will work fine.
Cooling rack
Paper bags or paper towels
Pastry Brush
Cheesecloth
Sieve or fine wire mesh strainer
Electric Mixer, stand or hand, optional, as mixing the filling with a spoon is fine.
Food Processor or Stand Mixer – also optional, since you can make the dough by hand, although it takes more time.
Rolling pin and/or Pasta roller/machine
Pastry or cutting board
Round cutters - The dough can also be cut into squares and rolled around the cannoli tube prior to frying. If making a stacked cannoli, any shaped cutter is fine, as well as a sharp knife.
Mixing bowl and wooden spoon if mixing filling by hand
Plastic Wrap/Clingfilm
Tea towels or just cloth towels

CANNOLI SHELLS


2 cups all-purpose flour
2 tablespoons sugar
1 teaspoon unsweetened baking cocoa powder
1/2 teaspoon ground cinnamon
1/2 teaspoon salt
3 tablespoons vegetable or olive oil
1 teaspoon white wine vinegar
Approximately 1/2 cup sweet Marsala or any white or red wine you have on hand
1 large egg, separated (you will need the egg white but not the yolk)
Vegetable or any neutral oil for frying – about 2 quarts (8 cups)

Note - If you want a chocolate cannoli dough, substitute a few tablespoons of the flour (about 25%) with a few tablespoons of dark, unsweetened cocoa powder (Dutch process) and a little more wine until you have a workable dough (Thanks to Audax).

CANNOLI FILLING
2 lbs ricotta cheese, drained
1 2/3 cups cup confectioner’s sugar, (more or less, depending on how sweet you want it), sifted
1/2 teaspoon ground cinnamon
1 teaspoon pure vanilla extract or the beans from one vanilla bean
3 tablespoons finely chopped good quality chocolate of your choice
2 tablespoons of finely chopped, candied orange peel, or the grated zest of one small to medium orange

Note - If you want chocolate ricotta filling, add a few tablespoons of dark, unsweetened cocoa powder to the above recipe, and thin it out with a few drops of warm water if too thick to pipe.

DIRECTIONS FOR SHELLS:


1. In the bowl of an electric stand mixer or food processor, combine the flour, sugar, cocoa, cinnamon, and salt. Stir in the oil, vinegar, and enough of the wine to make a soft dough. Turn the dough out onto a lightly floured surface and knead until smooth and well blended, about 2 minutes. Shape the dough into a ball. Cover with plastic wrap and let rest in the fridge from 2 hours to overnight.

2 Cut the dough into two pieces. Keep the remaining dough covered while you work. Lightly flour a large cutting or pastry board and roll the dough until super thin, about 1/16 to 1/8” thick (An area of about 13 inches by 18 inches should give you that). Cut out 3 to 5-inch circles (3-inch – small/medium; 4-inch – medium/large; 5-inch;- large. Your choice). Roll the cut out circle into an oval, rolling it larger and thinner if it’s shrunk a little.

3 Oil the outside of the cannoli tubes (You only have to do this once, as the oil from the deep fry will keep them well, uhh, oiled..lol). Roll a dough oval from the long side (If square, position like a diamond, and place tube/form on the corner closest to you, then roll) around each tube/form and dab a little egg white on the dough where the edges overlap. (Avoid getting egg white on the tube, or the pastry will stick to it.) Press well to seal. Set aside to let the egg white seal dry a little.

4. In a deep heavy saucepan, pour enough oil to reach a depth of 3 inches, or if using an electric deep-fryer, follow the manufacturer's directions. Heat the oil to 375°F (190 °C) on a deep fry thermometer, or until a small piece of the dough or bread cube placed in the oil sizzles and browns in 1 minute. Have ready a tray or sheet pan lined with paper towels or paper bags.

5. Carefully lower a few of the cannoli tubes into the hot oil. Do not crowd the pan. Fry the shells until golden, about 2 minutes, turning them so that they brown evenly.

8. Lift a cannoli tube with a wire skimmer or large slotted spoon, out of the oil. Using tongs, grasp the cannoli tube at one end. Very carefully remove the cannoli tube with the open sides straight up and down so that the oil flows back into the pan. Place the tube on paper towels or bags to drain. Repeat with the remaining tubes. While they are still hot, grasp the tubes with a potholder and pull the cannoli shells off the tubes with a pair of tongs, or with your hand protected by an oven mitt or towel. Let the shells cool completely on the paper towels. Place shells on cooling rack until ready to fill.

9. Repeat making and frying the shells with the remaining dough. If you are reusing the cannoli tubes, let them cool before wrapping them in the dough.

Pasta Machine method:
1. Divide the dough into 4 equal pieces. Starting at the middle setting, run one of the pieces of dough through the rollers of a pasta machine. Lightly dust the dough with flour as needed to keep it from sticking. Pass the dough through the machine repeatedly, until you reach the highest or second highest setting. The dough should be about 4 inches wide and thin enough to see your hand through

2. Continue rolling out the remaining dough. If you do not have enough cannoli tubes for all of the dough, lay the pieces of dough on sheets of plastic wrap and keep them covered until you are ready to use them.

3, Roll, cut out and fry the cannoli shells as according to the directions above.

For stacked cannoli:
1. Heat 2-inches of oil in a saucepan or deep sauté pan, to 350-375°F (176 - 190 °C).

2. Cut out desired shapes with cutters or a sharp knife. Deep fry until golden brown and blistered on each side, about 1 – 2 minutes. Remove from oil with wire skimmer or large slotted spoon, then place on paper towels or bags until dry and grease free. If they balloon up in the hot oil, dock them lightly prior to frying. Place on cooling rack until ready to stack with filling.

Read more...

Macarons

>> Monday, October 26, 2009


This month the Daring Bakers challenge was to make the French pastry macarons.
This challenge has truly pushed my cooking ability to the limit.
My first two attempts were a learning experience to say the least. But my determination kept me from giving up.

Fortunately the third time my macarons finally turned out great.
Although there were early difficulties, I'm very glad I participated in this challenge and learn to make this wonderful macarons.


The 2009 October Daring Bakers’ challenge was brought to us by Ami S.
She chose macarons from Claudia Fleming’s The Last Course: The Desserts of Gramercy Tavern as the challenge recipe.


Ingredients

2 ¼ cups confectioners’ sugar (225 g, 8 oz.)

2 cups hazel nuts flour (190 g, 6.7 oz.)
2 Tablespoonsg sugar (25 g , .88 oz.)
5 Egg whites 5 (Have at room temperature)

Directions:

1. Preheat the oven to 200°F (93°C).
Combine the confectioners’ sugar and almond flour in a medium bowl.
If grinding your own nuts, combine nuts and a cup of confectioners’ sugar in the bowl of a food
processor and grind until nuts are very fine and powdery.


2. Beat the egg whites in the clean dry bowl of a stand mixer until they hold soft peaks.
Slowly add the granulated sugar and beat until the mixture holds stiff peaks.


3. Sift a third of the almond flour mixture into the meringue and fold gently to combine.
If you are planning on adding zest or other flavorings to the batter, now is the time.
Sift in the remaining almond flour in two batches. Be gentle!
Don’t overfold, but fully incorporate your ingredients.


4. Spoon the mixture into a pastry bag fitted with a plain half-inch tip (Ateco #806).
You can also use a Ziploc bag with a corner cut off. It’s easiest to fill your bag if you stand it up
in a tall glass and fold the top down before spooning in the batter.


5. Pipe one-inch-sized (2.5 cm) mounds of batter onto baking sheets lined with nonstick liners
(or parchment paper).


6. Bake the macaroon for 5 minutes. Remove the pan from the oven and raise the temperature
to 375°F (190°C). Once the oven is up to temperature, put the pans back in the oven and bake
for an additional 7 to 8 minutes, or lightly colored.


7. Cool on a rack before filling.

Ganage filling
100 gr. white chocolate
1/4 cup heavy cream

In a small pan over medium heat mix the chocolate with the heavy cream until completely melted, cool for 1 hour.
place a small amount on top of one macarons and close with another one.

Read more...

Mallow & Milan Cookies - Daring Bakers

>> Sunday, July 26, 2009


The July Daring Bakers' challenge was hosted by Nicole at Sweet Tooth.
She chose Chocolate Covered Marshmallow Cookies and Milan Cookies from pastry chef Gale Gand of the Food Network.


Mallows(Chocolate Covered Marshmallow Cookies)
Recipe courtesy Gale Gand, from Food Network website

Prep Time: 10 min
Inactive Prep Time: 5 min
Cook Time: 10 min
Serves: about 2 dozen cookies

• 3 cups (375grams/13.23oz) all purpose flour
• 1/2 cup (112.5grams/3.97oz) white sugar
• 1/2 teaspoon salt
• 3/4 teaspoon baking powder
• 3/8 teaspoon baking soda
• 1/2 teaspoon ground cinnamon
• 12 tablespoons (170grams/ 6 oz) unsalted butter
• 3 eggs, whisked together
• Homemade marshmallows, recipe follows
• Chocolate glaze, recipe follows

1. In a mixer with the paddle attachment, blend the dry ingredients.
2. On low speed, add the butter and mix until sandy.
3. Add the eggs and mix until combine.
4. Form the dough into a disk, wrap with clingfilm or parchment and refrigerate at least 1 hour and up to 3 days.
5. When ready to bake, grease a cookie sheet or line it with parchment paper or a silicon mat.
6. Preheat the oven to 375 degrees F.
7. Roll out the dough to 1/8-inch thickness, on a lightly floured surface. Use a 1 to 1 1/2 inches cookie cutter to cut out small rounds of dough.
8. Transfer to the prepared pan and bake for 10 minutes or until light golden brown. Let cool to room temperature.
9. Pipe a “kiss” of marshmallow onto each cookie. Let set at room temperature for 2 hours.
10. Line a cookie sheet with parchment or silicon mat.
11. One at a time, gently drop the marshmallow-topped cookies into the hot chocolate glaze.
12. Lift out with a fork and let excess chocolate drip back into the bowl.
13. Place on the prepared pan and let set at room temperature until the coating is firm, about 1 to 2 hours.

Note: if you don’t want to make your own marshmallows, you can cut a large marshmallow in half and place on the cookie base. Heat in a preheated 350-degree oven to slump the marshmallow slightly, it will expand and brown a little. Let cool, then proceed with the chocolate dipping.


Homemade marshmallows:
• 1/4 cup water
• 1/4 cup light corn syrup
• 3/4 cup (168.76 grams/5.95oz) sugar
• 1 tablespoon powdered gelatin
• 2 tablespoons cold water
• 2 egg whites , room temperature
• 1/4 teaspoon pure vanilla extract

1. In a saucepan, combine the water, corn syrup, and sugar, bring to a boil until “soft-ball” stage, or 235 degrees on a candy thermometer.
2. Sprinkle the gelatin over the cold water and let dissolve.
3. Remove the syrup from the heat, add the gelatin, and mix.
4. Whip the whites until soft peaks form and pour the syrup into the whites.
5. Add the vanilla and continue whipping until stiff.
6. Transfer to a pastry bag.

Chocolate glaze:
• 12 ounces semisweet chocolate
• 2 ounces cocoa butter or vegetable oil

1. Melt the 2 ingredients together in the top of a double boiler or a bowl set over barely simmering water.


Milan Cookies
Recipe courtesy Gale Gand, from Food Network website

Prep Time: 20 min
Inactive Prep Time: 0 min
Cook Time: 1 hr 0 min
Serves: about 3 dozen cookies

• 12 tablespoons (170grams/ 6 oz) unsalted butter, softened
• 2 1/2 cups (312.5 grams/ 11.02 oz) powdered sugar
• 7/8 cup egg whites (from about 6 eggs)
• 2 tablespoons vanilla extract
• 2 tablespoons lemon extract
• 1 1/2 cups (187.5grams/ 6.61 oz) all purpose flour
• Cookie filling, recipe follows

Cookie filling:
• 1/2 cup heavy cream
• 8 ounces semisweet chocolate, chopped
• 1 orange, zested

1. In a mixer with paddle attachment cream the butter and the sugar.
2. Add the egg whites gradually and then mix in the vanilla and lemon extracts.
3. Add the flour and mix until just well mixed.
4. With a small (1/4-inch) plain tip, pipe 1-inch sections of batter onto a parchment-lined sheet pan, spacing them 2 inches apart as they spread.
5. Bake in a preheated 350 degree oven for 10 minutes or until light golden brown around the edges. Let cool on the pan.
6. While waiting for the cookies to cool, in a small saucepan over medium flame, scald cream.
7. Pour hot cream over chocolate in a bowl, whisk to melt chocolate, add zest and blend well.
8. Set aside to cool (the mixture will thicken as it cools).
9. Spread a thin amount of the filling onto the flat side of a cookie while the filling is still soft and press the flat side of a second cookie on top.
10. Repeat with the remainder of the cookies.

Read more...

Bakewell Tart…er…pudding -Daring Bakers Challange

>> Saturday, June 27, 2009


The June Daring Bakers’ challenge was hosted by Jasmine of Confessions of a Cardamom Addict and Annemarie of Ambrosia and Nectar. They chose a Traditional (UK) Bakewell Tart… er… pudding that was inspired by a rich baking history dating back to the 1800’s in England.

This version is a combination of the two: a sweet almond-flavoured shortcrust pastry, frangipane and home made lemon curd.

For the jam, I made lemon curd which was the perfect combination with cherry jam.
I made my tart chocolate flavor by adding coco powder to the flour and cover them with melted chocolate. and some of them I just cover with lemon curd and nuts.

I was really pleased with this challenge and plan on making it again.
Thank you to this months hostesses.

Sweet shortcrust pastry recipe

Prep time: 15-20 minutes
Resting time: 30 minutes (minimum)
Equipment needed: bowls, box grater, cling film

225g (8oz) all purpose flour - 2 Tablespoon
2 Tablespoon coco powder
30g (1oz) sugar
2.5ml (½ tsp) salt
110g (4oz) unsalted butter, cold (frozen is better)
2 (2) egg yolks
2.5ml (½ tsp) almond extract (optional)
15-30ml (1-2 Tbsp) cold water

Sift together flour, sugar and salt. Grate butter into the flour mixture, using the large hole-side of a box grater. Using your finger tips only, and working very quickly, rub the fat into the flour until the mixture resembles bread crumbs. Set aside.

Lightly beat the egg yolks with the almond extract (if using) and quickly mix into the flour mixture. Keep mixing while dribbling in the water, only adding enough to form a cohesive and slightly sticky dough.

Form the dough into a disc, wrap in cling and refrigerate for at least 30 minutes

Frangipane recipe

Prep time: 10-15 minutes
Equipment needed: bowls, hand mixer, rubber spatula

125g (4.5oz) unsalted butter, softened
125g (4.5oz) icing sugar
3 (3) eggs
2.5ml (½ tsp) almond extract
125g (4.5oz) ground almonds
30g (1oz) all purpose flour

Chocolate glaze

100g raspberry bitter chocolate
2 tablespoon unsalted butter
2 tablespoon milk

on a heavy pot melt the butter and the chocolate together add the milk and mix it to a smooth texture. let cool.


Cream butter and sugar together for about a minute or until the mixture is primrose in colour and very fluffy. Scrape down the side of the bowl and add the eggs, one at a time, beating well after each addition. The batter may appear to curdle.
In the words of Douglas Adams: Don’t panic. Really. It’ll be fine. After all three are in, pour in the almond extract and mix for about another 30 seconds and scrape down the sides again. With the beaters on, spoon in the ground nuts and the flour. Mix well. The mixture will be soft, keep its slightly curdled look (mostly from the almonds) and retain its pallid yellow colour.

Assembling the tart

Place the chilled dough disc on a lightly floured surface.
If it’s overly cold, you will need to let it become acclimatised for about 15 minutes before you roll it out. Flour the rolling pin and roll the pastry to 5mm (1/4”) thickness, by rolling in one direction only (start from the center and roll away from you), and turning the disc a quarter turn after each roll. When the pastry is to the desired size and thickness, transfer it to the tart pan, press in and trim the excess dough. Patch any holes, fissures or tears with trimmed bits.
Chill in the freezer for 15 minutes.

Preheat oven to 200C/400F.

Remove shell from freezer, spread an even layer of cherry jam onto the pastry base and on it lemon curd. Top with frangipane, spreading to cover the entire surface of the tart. Smooth the top and pop into the oven for 30 minutes.
Five minutes before the tart is done, the top will be poofy and brownish. Remove from oven and strew flaked almonds on top and return to the heat for the last five minutes of baking.

The finished tart will have a golden crust and the frangipane will be tanned, poofy and a bit spongy-looking. Remove from the oven and cool on the counter. Pour the melted chocolate evenly on the tarts.

When you slice into the tart, the almond paste will be firm, but slightly squidgy and the crust should be crisp but not tough.


Read more...

Daring Bakers - Dried Fruit Strudel

>> Wednesday, May 27, 2009


My first reaction to the May Challenge was happiness I was delighted since my family adore stuffed cakes; but then when I read the instruction for the dough I panicked, so I doubled the batch to make 2 Strudel just in case one failed.

Fortunately, my worries disappeared once I felt the dough; it was so soft and fun to work it.
For my Strudel I decided to use dried fruits cinnamon and nuts.


The May Daring Baker's challenge was hosted by Linda of Make Life Sweeter! and Courtney of Coco cook. They chose Apple Strudel from the recipe book Kaffeehaus Exquisite Desserts from the classic cafe's of Vienna, Budapest and Prauge by Rick Rodgers.


Strudel dough
from “Kaffeehaus – Exquisite Desserts from the Classic Cafés of Vienna, Budapest and Prague” by Rick Rodgers

1 1/3 cups (200 g) unbleached flour
1/8 teaspoon salt
7 tablespoons (105 ml) water, plus more if needed
2 tablespoons (30 ml) vegetable oil, plus additional for coating the dough
1/2 teaspoon cider vinegar

1. Combine the flour and salt in a stand-mixer fitted with the paddle attachment. Mix the water, oil and vinegar in a measuring cup. Add the water/oil mixture to the flour with the mixer on low speed. You will get a soft dough. Make sure it is not too dry, add a little more water if necessary.
Take the dough out of the mixer. Change to the dough hook. Put the dough ball back in the mixer. Let the dough knead on medium until you get a soft dough ball with a somewhat rough surface.

2. Take the dough out of the mixer and continue kneading by hand on an unfloured work surface. Knead for about 2 minutes. Pick up the dough and throw it down hard onto your working surface occasionally.
Shape the dough into a ball and transfer it to a plate. Oil the top of the dough ball lightly. Cover the ball tightly with plastic wrap. Allow to stand for 30-90 minutes (longer is better).

3. It would be best if you have a work area that you can walk around on all sides like a 36 inch (90 cm) round table or a work surface of 23 x 38 inches (60 x 100 cm). Cover your working area with table cloth, dust it with flour and rub it into the fabric. Put your dough ball in the middle and roll it out as much as you can.
Pick the dough up by holding it by an edge. This way the weight of the dough and gravity can help stretching it as it hangs. Using the back of your hands to gently stretch and pull the dough. You can use your forearms to support it.

4. The dough will become too large to hold. Put it on your work surface. Leave the thicker edge of the dough to hang over the edge of the table. Place your hands underneath the dough and stretch and pull the dough thinner using the backs of your hands. Stretch and pull the dough until it's about 2 feet (60 cm) wide and 3 feet (90 cm) long, it will be tissue-thin by this time. Cut away the thick dough around the edges with scissors. The dough is now ready to be filled.

Tips
- Ingredients are cheap so we would recommend making a double batch of the dough, that way you can practice the pulling and stretching of the dough with the first batch and if it doesn't come out like it should you can use the second batch to give it another try;
- The tablecloth can be cotton or polyster;
- Before pulling and stretching the dough, remove your jewelry from hands and wrists, and wear short-sleeves;
- To make it easier to pull the dough, you can use your hip to secure the dough against the edge of the table;
- Few small holes in the dough is not a problem as the dough will be rolled, making (most of) the holes invisible.

Dried Fruit Filling
2 tablespoons (30 ml) golden rum
3 tablespoons (45 ml) raisins
1/4 teaspoon ground cinnamon
1/3 cup plus 1 tablespoon (80 g) sugar
1/2 cup (1 stick / 115 g) unsalted butter, melted, divided
1 1/2 cups (350 ml) fresh bread crumbs
1/2 cup (120 ml, about 60 g) coarsely chopped walnuts
1 cup dried mix fruits

1. Mix the rum and raisins in a bowl. Mix the cinnamon and sugar in another bowl.

2. Heat 3 tablespoons of the butter in a large skillet over medium-high. Add the breadcrumbs and cook whilst stirring until golden and toasted. This will take about 3 minutes. Let it cool completely.

3. Put the rack in the upper third of the oven and preheat the oven to 400°F (200°C). Line a large baking sheet with baking paper (parchment paper). Make the strudel dough as described below. Spread about 3 tablespoons of the remaining melted butter over the dough using your hands (a bristle brush could tear the dough, you could use a special feather pastry brush instead of your hands). Sprinkle the buttered dough with the bread crumbs. Spread the walnuts about 3 inches (8 cm) from the short edge of the dough in a 6-inch-(15cm)-wide strip. Mix the dried fruits with the raisins (including the rum), and the cinnamon sugar. Spread the mixture over the walnuts.

4. Fold the short end of the dough onto the filling. Lift the tablecloth at the short end of the dough so that the strudel rolls onto itself. Transfer the strudel to the prepared baking sheet by lifting it. Curve it into a horseshoe to fit. Tuck the ends under the strudel. Brush the top with the remaining melted butter and brown sugar.

5. Bake the strudel for about 30 minutes or until it is deep golden brown. Cool for at least 30 minutes before slicing. Use a serrated knife and serve either warm or at room temperature. It is best on the day it is baked.


Thank you for a great challenge and great recipe !!

Read more...

Daring Bakers- Strawberry Cheese cake

>> Sunday, April 26, 2009


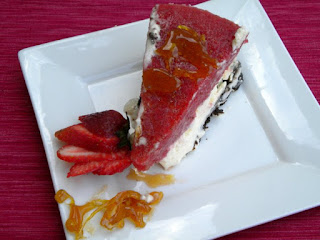
The April 2009 challenge is hosted by Jenny from Jenny Bakes. She has chosen Abbey's Infamous Cheesecake as the challenge.

I was so happy to find out April's challenge. Cheese cake is definitely my family favorite cake.
I wanted to combine the cake with some fresh fruit, so I thought strawberries, the red color with the white cake and the chocolate cookies will make a great combination.

I used chocolate cookies for the crumbs
this cake tasted so good it was difficult to get a picture, since everyone wanted a piece.


Abbey's Infamous Cheesecake:

crust:
2 cups / 180 g graham cracker crumbs (I used chocolate cookies)
1 stick / 4 oz butter, melted
2 tbsp. / 24 g sugar
1 tsp. vanilla extract

cheesecake:
3 sticks of cream cheese, 8 oz each (total of 24 oz) room temperature
1 cup / 210 g sugar
3 large eggs
1 cup / 8 oz heavy cream
1 tbsp. lemon juice
1 tbsp. vanilla extract (or the innards of a vanilla bean)
1 tbsp liqueur, optional, but choose what will work well with your cheesecake

DIRECTIONS:
1. Preheat oven to 350 degrees. Begin to boil a large pot of water for the water bath.

2. Mix together the crust ingredients and press into your preferred pan. You can press the crust just into the bottom, or up the sides of the pan too - baker's choice. Set crust aside.

3. Combine cream cheese and sugar in the bowl of a stand-mixer (or in a large bowl if using a hand-mixer) and cream together until smooth. Add eggs, one at a time, fully incorporating each before adding the next. Make sure to scrape down the bowl in between each egg. Add heavy cream, vanilla, lemon juice, and alcohol and blend until smooth and creamy.

4. Pour batter into prepared crust and tap the pan on the counter a few times to bring all air bubbles to the surface. Place pan into a larger pan and pour boiling water into the larger pan until halfway up the side of the cheesecake pan. If cheesecake pan is not airtight, cover bottom securely with foil before adding water.

5. Bake 45 to 55 minutes, until it is almost done - this can be hard to judge, but you're looking for the cake to hold together, but still have a lot of jiggle to it in the center. You don't want it to be completely firm at this stage. Close the oven door, turn the heat off, and let rest in the cooling oven for one hour. This lets the cake finish cooking and cool down gently enough so that it won't crack on the top. After one hour, remove cheesecake from oven and lift carefully out of water bath. Let it finish cooling on the counter, and then cover and put in the fridge to chill. Once fully chilled, it is ready to serve.

Pan note: The creator of this recipe used to use a springform pan, but no matter how well she wrapped the thing in tin foil, water would always seep in and make the crust soggy. Now she uses one of those 1-use foil "casserole" shaped pans from the grocery store. They're 8 or 9 inches wide and really deep, and best of all, water-tight. When it comes time to serve, just cut the foil away.

Strawberry Topping
2 cups sliced fresh strawberries
1 tsp. unflavored gelatin
1/2 cup sugar

Place sliced strawberries in a food processor, cover and process until smooth.
Dissolve the gelatin with hot water and mix it with the strawberries.
add the sugar and mix until dissolved.

Top with the strawberry filling and refrigerate for 4 hours.

Caramel decoration
1/2 cup sugar
1 tsp. lemon juice

In a heavy saucepan over medium heat; heat the sugar until golden brown, reduce the heat and add the lemon juice, mix all the time.
drizzle the caramel over the strawberry topping and with a fork make strips and circles for design.

refrigerate overnight.

Serving in a cup

Read more...

Lasagne of Emilia-Romagna: Daring Bakers March 2009

>> Friday, March 27, 2009


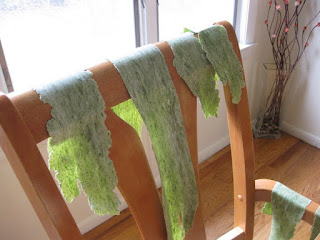
I was so excited to join the daring bakers! But I became terrified to learn that the first challenge was to make Lasagna, because I never made pasta by myself before, so it was a really challenging.

The March 2009 challenge is hosted by Mary of "Beans And Caviar" (Canada), Melinda of "Melbourne Larder" (Australia) and Enza of "Io Da Grande" (Italy). They have chosen "Lasagne Of Emilia-Romagna" from "The Splendid Table" by Lynne Rossetto Kasper as the challenge.

Due to my religion, I couldn’t stick with the original recipe, so I decided to make mushroom Lasagna, the results were so good that my kids can't wait for the next time I’ll make it...

Making the pasta was fun; I used my mother-in-law’s new pasta machine. My kids helped me find places all over the house, where we could stick the pasta to dry. It was really an adventure!

I can't wait for the next challenge!!!


Lasagne of Emilia-Romagna (Lasagne Verdi al Forno)
(Serves 6 as a main dish)

  • 9 litres salted water
  • 1 recipe Spinach Pasta cut for lasagna (recipe follows)#1
  • 1 recipe Bechamel Sauce (recipe follows)#2
  • 1 recipe Country Style Ragu (recipe follows)#3
  • 1 cup (4 ounces/125g) freshly grated Parmigiano-Reggiano

Method

Working Ahead:
The ragu and the béchamel sauce can be made up to three days ahead. The ragu can also be frozen for up to one month. The pasta can be rolled out, cut and dried up to 24 hours before cooking. The assembled lasagne can wait at room temperature (20 degrees Celsius/68 degrees Fahrenheit) about 1 hour before baking. Do not refrigerate it before baking, as the topping of béchamel and cheese will overcook by the time the center is hot.

#1 Spinach Egg Pasta (Pasta Verde)

Preparation: 45 minutes

Makes enough for 6 to 8 first course servings or 4 to 6 main course servings, equivalent to 1 pound (450g) dried boxed pasta.

  • 2 jumbo eggs (2 ounces/60g or more)
  • 10 ounces (300g) fresh spinach, rinsed dry, and finely chopped; or 6 ounces (170g) frozen chopped spinach, defrosted and squeezed dry
  • 3&1/2 cups (14 ounces/400g) all purpose unbleached (plain) flour (organic stone ground preferred)

Working by Hand:

Equipment

A roomy work surface, 24 to 30 inches deep by 30 to 36 inches (60cm to 77cm deep by 60cm to 92cm). Any smooth surface will do, but marble cools dough slightly, making it less flexible than desired.

A wooden dowel-style rolling pin. In Italy, pasta makers use one about 35 inches long and 2 inches thick (89cm long and 5cm thick). The shorter American-style pin with handles at either end can be used, but the longer it is, the easier it is to roll the pasta.
If you have a pasta maker (which we do) it is much easier and quicker and is likely to produce thinner pasta.

Method for Dough

  1. Mound the flour in the center of your work surface and make a well in the middle.
  2. Add the eggs and spinach. Use a wooden spoon to beat together the eggs and spinach.
  3. Then gradually start incorporating shallow scrapings of flour from the sides of the well into the liquid. As you work more and more flour into the liquid, the well’s sides may collapse.
  4. Use a pastry scraper to keep the liquids from running off and to incorporate the last bits of flour into the dough. Don’t worry if it looks like a hopelessly rough and messy lump.
  5. With the aid of the scraper to scoop up unruly pieces, start kneading the dough.
  6. Once it becomes a cohesive mass, use the scraper to remove any bits of hard flour on the work surface – these will make the dough lumpy.
  7. Knead the dough for about 3 minutes. Its consistency should be elastic and a little sticky. If it is too sticky to move easily, knead in a few more tablespoons of flour.
  8. Continue kneading about 10 minutes, or until the dough has become satiny, smooth, and very elastic.
  9. It will feel alive under your hands. Do not shortcut this step. Wrap the dough in plastic wrap, and let it relax at room temperature 30 minutes to 3 hours.
  10. If using an extra-long rolling pin work with half the dough at a time. With a regular-length rolling pin, roll out a quarter of the dough at a time and keep the rest of the dough wrapped.
  11. Lightly sprinkle a large work surface with flour. The idea is to stretch the dough rather than press down and push it.
  12. Shape it into a ball and begin rolling out to form a circle, frequently turning the disc of dough a quarter turn.
  13. As it thins outs, start rolling the disc back on the pin a quarter of the way toward the center and stretching it gently sideways by running the palms of your hands over the rolled-up dough from the center of the pin outward.
  14. Unroll, turn the disc a quarter turn, and repeat. Do twice more.
  15. Stretch and even out the center of the disc by rolling the dough a quarter of the way back on the pin. Then gently push the rolling pin away from you with one hand while holding the sheet in place on the work surface with the other hand. Repeat three more times, turning the dough a quarter turn each time.
  16. Repeat the two processes as the disc becomes larger and thinner. The goal is a sheet of even thickness. For lasagne, the sheet should be so thin that you can clearly see your hand through it and see colours. Cut into rectangles to fit your baking dish. Note: Enza says that transparency is a crucial element of lasagne pasta and the dough should be rolled as thinly as possible. She says this is why her housekeeper has such strong arms!
  17. If using a pasta machine, start on notch one (largest gap for pasta to go through) and roll pasta through. Repeat process changing down one notch at a time, from two to three etc. I took mine pasta down to notch 6 which was almost paper thin.
  18. Dry the pasta at room temperature if you are not going to use it straight away and store in a sealed container or bag. I prefer to use mine fresh to eliminate pre cooking the pasta.

#2 Bechamel

Preparation Time: 15 minutes

  • 4 tablespoons (2 ounces/60g) unsalted butter
  • 4 tablespoons (2 ounces/60g) all purpose unbleached (plain) flour, organic stone ground preferred
  • 2&2/3 cups (approx 570ml) hot milk
  • Salt and freshly ground pepper to taste

Method for Bechamel

  1. Using a medium-sized saucepan, melt the butter over low to medium heat.
  2. Sift flour into saucepan, whisk until smooth, and then stir (without stopping) for about 3 minutes.
  3. Whisk in the hot milk a little at a time and keep the mixture smooth.
  4. Bring to a slow simmer, and stir 3 to 4 minutes, or until the sauce thickens.
  5. Cook, stirring, for about 5 minutes, until the sauce thickens. Season with salt, pepper.
  6. Cover with greaseproof paper to prevent a skin forming and place in fridge till ready to use.
Mushroom Ragu

1/4 cup extra virgin olive oil

2 garlic clove

1 medium onion, chopped

12 oz. mushrooms, cleaned and finely chopped

1 can water chestnut chopped

3 Tbsp basil chopped

1/2 cup white cooking wine

1 cup fresh tomato sauce

1 Tbsp butter

1 Teaspoon nut mug

Salt & pepper, to taste

In a saucepan cook the onion and the garlic until light golden. Add the mushrooms and the water chest nut and cook until the juices are released and evaporate, about 10 minutes. Add the wine, tomato sauce and butter, and season with salt and pepper. Reduce the heat to medium and cook another 5 minutes or so, or until somewhat thickened. Set aside.

Assembling the Lasagne:
Spread a thin layer of béchamel over the bottom of the baking dish. Arrange a layer of about four overlapping sheets of pasta over the béchamel. Spread a thin layer of béchamel (about 3 or 4 spoonfuls) over the pasta, and then an equally thin layer of the ragu. Sprinkle with about 1&1/2 tablespoons of the béchamel and about 1/3 cup of the cheese. Repeat the layers until all ingredients are used, finishing with béchamel sauce and topping with a generous dusting of cheese.

Read more...

  © Blogger template Simple n' Sweet by Ourblogtemplates.com 2009

Back to TOP